
Welcome to the world of culinary delight!
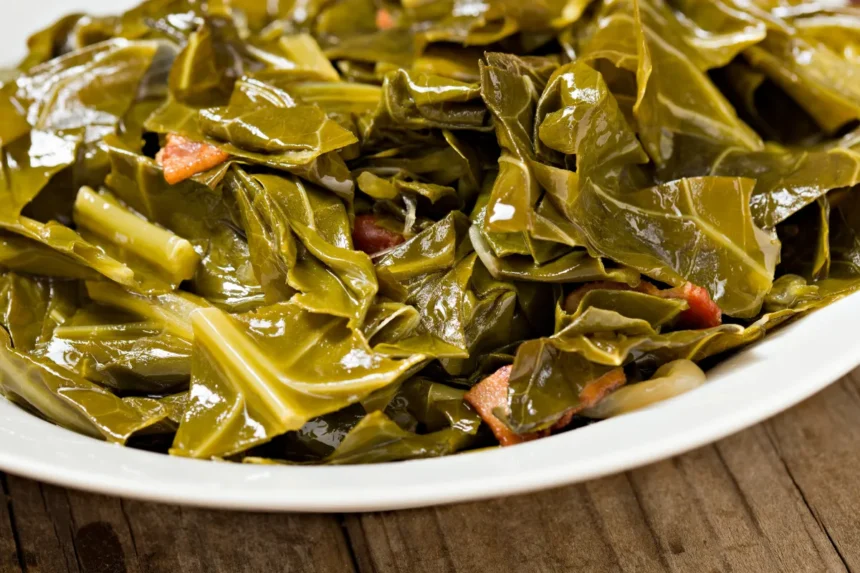
Today, we embark on a journey to create a mouthwatering dish that tantalizes the taste buds and warms the soul: Braised Bacon Collard Greens.

This hearty recipe combines the rich flavors of bacon with the wholesome goodness of collard greens, resulting in a dish that’s both comforting and satisfying.
Follow along as we dive into the art of braising and discover the secrets to making the perfect Braised Bacon Collard Greens.
Gather Your Ingredients
Let’s start by gathering the necessary ingredients for our Braised Bacon Collard Greens:
- 1 bunch of fresh collard greens
- 6 slices of thick-cut bacon
- 1 onion, diced
- 3 cloves of garlic, minced
- 2 cups of chicken broth
- 1 tablespoon of apple cider vinegar
- Salt and pepper to taste
Prepare the Collard Greens
Begin by thoroughly washing the collard greens under cold running water.
Remove the tough stems and chop the leaves into bite-sized pieces. Set aside while we prepare the bacon.
Cook the Bacon
In a large skillet or Dutch oven, cook the bacon over medium heat until it becomes crispy and golden brown.

Once cooked, remove the bacon from the skillet and set it aside on a paper towel-lined plate to drain excess grease.
Don’t discard the bacon grease in the skillet, as we’ll be using it to add flavor to our collard greens.
Sauté the Aromatics
Using the same skillet with the bacon grease, add the diced onion and minced garlic.
Sauté them until they become soft and translucent, releasing their savory aroma and flavor.
This step is crucial for building a robust flavor base for our Braised Bacon Collard Greens.
Braise the Collard Greens
Now it’s time to add the prepared collard greens to the skillet.
Stir them gently to coat them with the onion, garlic, and bacon grease mixture.
Pour in the chicken broth and apple cider vinegar, then season with salt and pepper to taste.
Bring the mixture to a simmer, then reduce the heat to low and cover the skillet.
Allow the collard greens to braise for about 45 minutes to 1 hour, or until they are tender and have absorbed the flavors of the bacon and aromatics.
Stir occasionally to ensure even cooking and to prevent sticking.
Serve and Enjoy
Once the collard greens are tender and flavorful, it’s time to serve them up hot and ready to enjoy!
Crumble the cooked bacon over the top for an extra burst of flavor and texture.
Braised Bacon Collard Greens make a delicious side dish for any meal, or they can stand alone as a satisfying main course.
Conclusion
In conclusion, Braised Bacon Collard Greens are a delightful dish that brings together the savory goodness of bacon with the wholesome freshness of collard greens.
With simple ingredients and easy-to-follow steps, this recipe is sure to become a favorite in your culinary repertoire.
So gather your ingredients, fire up the skillet, and get ready to indulge in a flavor-packed adventure!
FAQs
Can I use other types of greens instead of collard greens?
While collard greens are traditional for this recipe, you can certainly experiment with other hearty greens like kale or Swiss chard for a unique twist.
Can I make Braised Bacon Collard Greens ahead of time?
Absolutely! In fact, the flavors tend to develop even more after sitting for a day or two in the refrigerator. Simply reheat them gently on the stove before serving.
I don’t eat bacon. Can I omit it from the recipe?
While bacon adds a distinct flavor to the dish, you can omit it for a vegetarian version of Braised Collard Greens.
Consider adding a splash of liquid smoke or smoked paprika for a similar smoky flavor.
What can I serve with Braised Bacon Collard Greens?
These greens pair well with a variety of dishes, including roasted meats, grilled chicken, or even as a topping for creamy mashed potatoes.
Can I freeze Braised Bacon Collard Greens for later?
Yes, you can freeze leftovers in an airtight container for up to 3 months.
Thaw them overnight in the refrigerator before reheating on the stove.